 22:01
22:01
 RAM KUMAR LANKE
Querying Data store
Hi guru,
You can execute sql queries in the data store.
Go to designer
Go to models
Go to data store
Right click on data store
click on data

Now you can we the data.

observe the following tabs on the top right side of the data store
 Click on new query

Then query editor open
Edit the query as per your wish
I had given example below

Click on ok
Then it will display the query results
Thanks guru
Ram kumar Lanke
You can execute sql queries in the data store.
Go to designer
Go to models
Go to data store
Right click on data store
click on data

Now you can we the data.

observe the following tabs on the top right side of the data store

Then query editor open
Edit the query as per your wish
I had given example below

Click on ok
Then it will display the query results
Thanks guru
Ram kumar Lanke
Counting number of rows - ODI Data store
Hi guru,
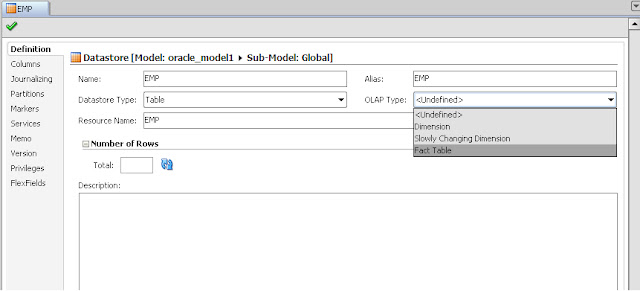
This post will explain the definition tab of data store.
And also how to count number of rows in a data store.
Click on any data store open it.
observe the total box
click on refresh button beside total box
Then you will get the total number of rows of the data store resource.
 Also check the following definition tab properties of the data store
In this way you can count the total number of rows in the data store
Thanks guru
Ram kumar Lanke
This post will explain the definition tab of data store.
And also how to count number of rows in a data store.
Click on any data store open it.
observe the total box
click on refresh button beside total box

Then you will get the total number of rows of the data store resource.

In this way you can count the total number of rows in the data store

Thanks guru
Ram kumar Lanke
ODI DataStore - Viewing Data
Hi Guru,
We can we data of a source file resource or table resource with in a data store without opining the actual file or table.
The following post explain the way.
Go to the designer
Go to the model
Select any data store which you want to we the data
Right click on the data store
click on view data


Then the data in the corresponding resource will be displayed
Thanks Guru
Ram kumar Lanke
Table Partitions supported - ODI Data store
Hi Guru,
We can create partitions in data stores.
Here are the Properties of partitions
1. Partition by:
Partitioning method. This list displays the partitioning methods supported by the technology on which the model relies.
2. Sub-partition by:
Sub-partition method. This list displays the partitioning methods supported by the technology on which the model relies. If you want to define sub-partitions in addition to partitions, select the sub-partitioning method.
Toolbar Items
Add Partition: Adds a partition at the end of the list
Add Sub-Partition: Adds a sub-partition at the end of the list
Delete Partition: Deletes the selected partition or sub-partition from the list
Procedure to create Partitions:
Click on any data store and open it
click on partitions

Select the partition type and sub partition type
click on add +

In this way you can create partitions.
The following Partitions are supported by ODI
Hash
Range
List
Range partitioning maps rows to partitions based on ranges of column values. Range partitioning is defined by the partitioning specification for a table or index in
An ordered list of values for the columns in the column list is called a
The following statement creates a table
Oracle Database uses a linear hashing algorithm and to prevent data from clustering within specific partitions, you should define the number of partitions by a power of two (for example, 2, 4, 8).
The following statement creates a table
CREATE TABLE sales_hash(salesman_id NUMBER(5), salesman_name VARCHAR2(30), sales_amount NUMBER(10), week_no NUMBER(2)) PARTITION BY HASH(salesman_id) PARTITIONS 4;
Ram kumar Lanke
We can create partitions in data stores.
Here are the Properties of partitions
1. Partition by:
Partitioning method. This list displays the partitioning methods supported by the technology on which the model relies.
2. Sub-partition by:
Sub-partition method. This list displays the partitioning methods supported by the technology on which the model relies. If you want to define sub-partitions in addition to partitions, select the sub-partitioning method.
Toolbar Items
Add Partition: Adds a partition at the end of the list
Add Sub-Partition: Adds a sub-partition at the end of the list
Delete Partition: Deletes the selected partition or sub-partition from the list
Procedure to create Partitions:
Click on any data store and open it
click on partitions

Select the partition type and sub partition type
click on add +

In this way you can create partitions.
The following Partitions are supported by ODI
Hash
Range
List
Range Partitioning
Range partitioning maps data to partitions based on ranges of partition key values that you establish for each partition. It is the most common type of partitioning and is often used with dates. For example, you might want to partition sales data into monthly partitions.Range partitioning maps rows to partitions based on ranges of column values. Range partitioning is defined by the partitioning specification for a table or index in
PARTITION BY RANGE(column_list) and by the partitioning specifications for each individual partition in VALUES LESS THAN(value_list), wherecolumn_list is an ordered list of columns that determines the partition to which a row or an index entry belongs. These columns are called the partitioning columns. The values in the partitioning columns of a particular row constitute that row's partitioning key.An ordered list of values for the columns in the column list is called a
value_list. Each value must be either a literal or a TO_DATE or RPAD function with constant arguments. Only the VALUES LESS THAN clause is allowed. This clause specifies a non-inclusive upper bound for the partitions. All partitions, except the first, have an implicit low value specified by the VALUES LESS THAN literal on the previous partition. Any binary values of the partition key equal to or higher than this literal are added to the next higher partition. Highest partition being where MAXVALUE literal is defined. Keyword, MAXVALUE, represents a virtual infinite value that sorts higher than any other value for the data type, including the null value.The following statement creates a table
sales_range that is range partitioned on the sales_date field:CREATE TABLE sales_range (salesman_id NUMBER(5), salesman_name VARCHAR2(30), sales_amount NUMBER(10), sales_date DATE)COMPRESSPARTITION BY RANGE(sales_date)(PARTITION sales_jan2000 VALUES LESS THAN(TO_DATE('02/01/2000','DD/MM/YYYY')), PARTITION sales_feb2000 VALUES LESS THAN(TO_DATE('03/01/2000','DD/MM/YYYY')), PARTITION sales_mar2000 VALUES LESS THAN(TO_DATE('04/01/2000','DD/MM/YYYY')), PARTITION sales_apr2000 VALUES LESS THAN(TO_DATE('05/01/2000','DD/MM/YYYY'))); Hash Partitioning
Hash partitioning maps data to partitions based on a hashing algorithm that Oracle applies to a partitioning key that you identify. The hashing algorithm evenly distributes rows among partitions, giving partitions approximately the same size. Hash partitioning is the ideal method for distributing data evenly across devices. Hash partitioning is also an easy-to-use alternative to range partitioning, especially when the data to be partitioned is not historical.Oracle Database uses a linear hashing algorithm and to prevent data from clustering within specific partitions, you should define the number of partitions by a power of two (for example, 2, 4, 8).
The following statement creates a table
sales_hash, which is hash partitioned on the salesman_id field:CREATE TABLE sales_hash(salesman_id NUMBER(5), salesman_name VARCHAR2(30), sales_amount NUMBER(10), week_no NUMBER(2)) PARTITION BY HASH(salesman_id) PARTITIONS 4;
List Partitioning
List partitioning enables you to explicitly control how rows map to partitions. You do this by specifying a list of discrete values for the partitioning column in the description for each partition. This is different from range partitioning, where a range of values is associated with a partition and with hash partitioning, where you have no control of the row-to-partition mapping. The advantage of list partitioning is that you can group and organize unordered and unrelated sets of data in a natural way. The following example creates a list partitioned table grouping states according to their sales regions:CREATE TABLE sales_list(salesman_id NUMBER(5), salesman_name VARCHAR2(30),sales_state VARCHAR2(20),sales_amount NUMBER(10), sales_date DATE)PARTITION BY LIST(sales_state)(PARTITION sales_west VALUES('California', 'Hawaii') COMPRESS, PARTITION sales_east VALUES('New York', 'Virginia', 'Florida'), PARTITION sales_central VALUES('Texas', 'Illinois'));Thanks GuruRam kumar Lanke
ODI DataStore - Hide unused DataStore
Hi Guru,
We can hide temporarily not required data stores in a model.
Go to the model.
Right click on any data store which you want to hide.
Select hide.

then you can observe that data store is hidden
And it is under hidden data stores

If you want display it again
Right click on data store under hidden data stores
Select Display

In this way we can hide un used data stores
Thanks Guru
Ram kumar Lanke
We can hide temporarily not required data stores in a model.
Go to the model.
Right click on any data store which you want to hide.
Select hide.
then you can observe that data store is hidden
And it is under hidden data stores
If you want display it again
Right click on data store under hidden data stores
Select Display

Thanks Guru
Ram kumar Lanke
FRIDAY, 20 MAY 2011
Conditionaly replace data in a target data strore
Hi guru,
When executing an interface and using a filter to define subsets of data for intergration, we would like to ensure that the integration interface does not execute the IKM ( and associated TRUNCATE target step) when no records are loaded in the source data stores.
The simplest way of achieving this is to separate the logic into a set of package steps including an ODI variable to store the number of records transferred and to serve as an evaluation step.
The package contains the following steps:
1. Declare ODI variable step
2. an integration interface which transfers source records into a temporary table.
3. A refresh variable step using a sql statement which counts the number of records that have been transferred to the temporary table
4. Evaluate the variable and if no records the package will terminate. other wise the package will execute the following step.
5. Execute an integration interface to load data from the temporary table to the ultimate target table.
Thanks Guru
Ram kumar Lanke
MONDAY, 9 MAY 2011
Fast search for data store
Hi Guru's,
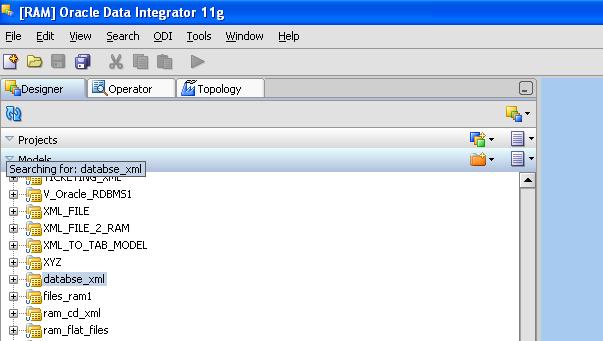
When you have multiple data stores in a model.
you just select the model name and start typing for the required data store.
It will automatically search the required data store.

Similarly, when you have multiple interfaces in a folder,
just select the folder name and start typing the interface name.
Thanks guru's
Ram Kumar Lanke
When you have multiple data stores in a model.
you just select the model name and start typing for the required data store.
It will automatically search the required data store.
Similarly, when you have multiple interfaces in a folder,
just select the folder name and start typing the interface name.
Thanks guru's
Ram Kumar Lanke
FRIDAY, 6 MAY 2011
MULTIPLE SOURCE FILES-MULTIPLE TARGET TABLES-SINGLE INTERFACE
Hi Guru’s,
We have seen in the last post how to load multiple source files of same structure into a single table.
Suppose if we want to load multiple source files into multiple target tables.
Then please just follow the same procedure which I explained in the previous post and do a little change to the target data store.
Open the source data store which is participating of the interface and replace the resource name with #Project_Name.FILE_NAME
Note : Project_Name means your project name
Note : Project_Name means your project name
That’s it .
Thanks Guru's
Ram Kumar Lanke
Thanks Guru's
Ram Kumar Lanke
MULTIPLE FILES - SINGLE TARGET TABLE-SINGLE INTERFACE
Hi Guru’s,
Hope you are fine.
Today let me share very important concept of ODI called using Variable as Resource name.
Suppose if we have multiple files of same structure to be loaded into a single target table, then we need not to use multiple interfaces.
Instead we can use a single interface to load all the flat files of same structure into the single target table.
I am going to try to explain the procedure with following steps
Suppose if we have three Flat files namely EMP1.txt, EMP2.txt and EMP3.txt to be loaded into TRG_EMP table of ORACLE database.
Before going to do this, you need to learn first how to load a single source flat file to a target table of oracle database.
To do the above please go through the following link provided by oracle by examples
ODI11g: Creating an ODI Project and Interface: Exporting a Flat File to a RDBMS Table
Using the above procedure load the EMP.txt file to
EMP table .
you can download the required files from the following link
Download source files
Now follow the following steps.
First we need to create a table using the following query
CREATE TABLE SRC_FILE_DETAILS
( FILE_NAME VARCHAR2(10 BYTE)
);
Then load the required file names into this table.
INSERT INTO src_file_details values 'EMP1'
INSERT INTO src_file_details values 'EMP2'
INSERT INTO src_file_details values 'EMP3'
Now create three variables with the following deatails
1) Name: count
Data type: Numeric
Action : latest Value
2) Name: Files_Count
Datatype: Numeric
Action: latest Value
Refreshing: select count(*) from src_file_details
3) Name: FILE_NAME
Datatype: Alphanumeric
Action: Latest value
Refreshing:
SELECT FILE_NAME FROM (SELECT FILE_NAME,ROWNUM RN FROM SRC_FILE_DETAILS) WHERE RN=#Project_Name.count
Note: Please replace Project_Name with your project name
Now open the source data store which is participating in the interface for populating target and replace the resource name with #Project_Name.FILE_NAME.txt

Now we are going to design a package looks like below:

Step1:
Drag and drop the count variable on to the diagram tab of package.
Click on it. Change the properties as shown in the following

Step2: Drag and drop the FILE_NAME variable on to the diagram tab of package.
Click on it. Change the properties as shown in the following
Step name: GetTheFileName
Type: Refresh variable
Step3:
Just drag and drop the interface and change the step name to PopTrgWithThisFileName
Step4:
Drag and drop the count variable.
Click on it. Change the properties as shown in the following

Step5:
Drag and drop the Files_Count variable.
Click on it. Change the properties as shown in the following
Step type : Refresh Variable
Step6:
Drag and drop the count variable on to the diagram tab of package.
Click on it. Change the properties as shown in the following
Drag and drop the Files_Count variable.
Click on it. Change the properties as shown in the following
Step type : Refresh Variable
Step6:
Drag and drop the count variable on to the diagram tab of package.
Click on it. Change the properties as shown in the following

Please replace Proj_Name with your project name
Save all
Run the package
That it.
Now life is so easy.
You can load a table with several files with single interface.
Thanks Guru’s
Ram Kumar Lanke


0 comments:
Post a Comment